The Process
Step 1: Script:
First I had to reflect on the statement: “I knew I was going to be an educator when..." For me, there were many reasons why I became an educator, so I jotted down some thoughts, and put together a script as I went along; I changed my script many times. Along with my script, I noted the order in which my images/videos would appear in my story. In the end, my script read like this:
(1. Book of Edgar Allan Poe (Picture): I remember Edgar Allan Poe from High School. His style, his diction, his signature... it stayed with me even after I graduated. During my first year in college, my mother remembered my love for Poe, and gave me this book. I read it cover to cover in an hour, and it was like falling in love but having no one to share it with. It was that moment when I realized I wanted to share those same emotions with others…stir up that same passion in someone else with reading, so that that’d want to relish in the amazement of stories with me. By nightfall I was already dreaming about becoming a teacher, and standing in front of my classroom discussing Romanticism, and I just knew it was going to happen.
(2. Biology-Plant (Picture): You have to understand, I was a biology major originally; studying about the life of living organisms. I was in love with Science; I still am. However, I was not enjoying my courses as a bio major, and I realized reading that Poe book was the first time in a long time that I felt passion for something…I felt motivated to do something else…What necessarily?…I did not know. I knew the other loves of my life were reading and writing, right up there with helping people, but I still remained conflicted. My mother and grandmother were teachers, and I did not want to feel like I was living their dreams.
(3. Temple University degree (Picture): I followed my head and my heart, and decided to make the change. I remember it was spring of 2010, and I was sitting in the conference room, along with other students, awaiting the presentation on becoming an Education major, at the Ritter Annex building at Temple University. The presenter talked forever, and let us know, this would be a long but rewarding journey. I was very excited, until I student taught.
(4. Student Teaching (video)
(5. CCA cup (Picture): I started with CCA 3 months after I graduated from Temple University, and it has been an experience unlike anything I could ever imagine; virtual schooling never crossed my mind when studying to become a teacher. CCA follows the individualized learning plan, therefore, we take the time to customize the lessons and assessments for each students to suit their individual life challenges. Its overbearing work for the teachers, but so meaningful for the students. The personalize notes and simple praises from both parents and students reassures me that I made the right choice 31/2 years ago.
(6. CCA Computer (Picture)
(7. Children (video)
(8. Children (Picture): My children keep me in the field of education. I treat my students the way I want teachers to treat my children, and so my students know me as an overprotecting, loving by tough motherly type. I can say too, I knew I was going to be an educator after I became a mother for the first time in 2009, and the value of children as our future leaders really weighed on me. My children keeps me going every day.
All of my images would have a voice over, and I was hoping to stay in the 3 minute to 5 minute range for the entire video.
Step 2: Checking phone requirements
I took a Digital Storytelling course at Wilkes University, and I must say it had to be one of the most challenging course I’ve ever taken. For that course, I used my Android—Samsung Note 4 Smartphone to take videos and photos and create movies. I would upload the media to my Google Drive or send it to my email address, and then download those files to my computer. Then I would upload the media using Movie Maker, move my tracks around, alter the times for each frame, and record over each track; the conversion process afterwards was another challenge in itself. Nonetheless, I knew my phone (though a bit outdated according to upgraded technological standards) could handle video and image capturing. I also knew I would be able to access Google Drive since my email address won’t allow any attachment over 20mb to be sent. Checking my phone’s capabilities was also helpful because I could determine early on that create my video and uploading it to my Blog all via the phone was not going to work.
Step 3: Selecting a Platform
My first challenge was selecting a platform to create my video. Of course my mind immediately went to tools and applications I’m comfortable and familiar with, such as MovieMaker or Adobe Sparks. I wanted to choose one of these for the most obvious reasons, and since I’ve been considered somewhat of a perfectionist, I like my finish products to be almost if not perfect. However, upon taking the advice of my instructor, I did decide to step out of my comfort zone and try something new. During the early weeks in this course, I explored both Voicethread and WeVideo; I never used either tool to create a video. I’m originally plan was to create my video using both platforms, and see which tool worked best for me in the end. Since I already had accounts with both tools, I started immediately. I uploaded my photos and images to Voicethread without any issues, and then I tried with WeVideo. I found with WeVideo, that it was more of a process. Once I uploaded my images to WeVideo, I had to drag the image to the track and then adjust the time; that was very tricky. Then if I wanted to upload a video, first I could only import them through my Google Drive to WeVideo because my computer would not let me upload them from my personal computer drive to the tool. After that, I had to find the video, in another location, and then drag them to the track. At this point, Voicethread is looking like the winner. Once all my media was upload Voicethread (which is Step 1 -Add Media), it was time Comment, Step 2, which entailed recording your voice or adding text to each piece of media. To me, it felt more like a presentation than an actual cohesive movie using Voicethread when I previewed my work. I wanted to feel like I was watching a movie, not click through slides, so I decided to go with WeVideo.
Step 4: Building my Story
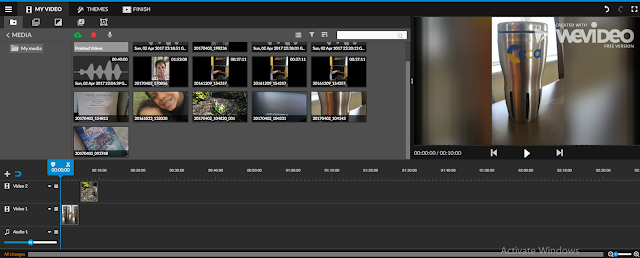
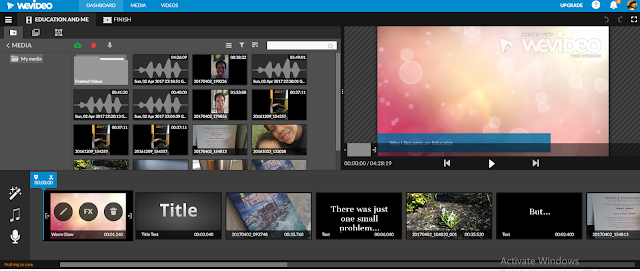
We were warned that creating this digital story would be a process, and I’m telling you that is an understatement; I was tempted to throw my computer out of the window about 5 times throughout the entire process. I’ve created some very complex videos before, but using WeVideo to create something for the first time was intense. When I started working in WeVideo, I was working in video mode, with tracks and many other features to create my work, and then I ran into my first challenge--arranging the tracks. For some reason, I could not figure out how to extend or retract my tracks without creating split tracks. Then, once I figured it out after 35 minutes, I was beginning to feel slightly overwhelmed with all the options and features available. I went to go save my work, and then saw the Storyboard mode option. I immediately perked up and could not believe I forgot about that option with WeVideo. I decided to switch over from Timeline Mode to Storyboard mode, fully understanding that my work would be lost and I would have to start over. So I did!
Timeline Mode
StoryMode was so much easier to work in--or so I thought, because it’s format seems to fit the purpose of creating a Digital Story so much better. I began again by importing my videos and images onto WeVideo Storyboard and then editing the times for each slide and incorporating text slides when appropriate. It wasn’t long before I ran into another issue during the audio recording. After almost an hour of believing I was clicking on the wrong thing or missing a step, I realized in Storyboard mode you can only do one voiceover that plays over the entire video--all the slides, whereas in Timeline mode, you can create individual audio recordings for each track. So, in order to do this correctly, I had to time each slide perfectly and speak over the slide with images in it’s allotted time frame before the video kept moving; of course I adjusted the time frames for each slide when appropriate. Hours later, I manage to finish my video, after several recording attempts, and hit FINISH at the top. Well, since my video was slightly over 5 minutes long, I had to upgrade my account; I remember brushing over the detail in the review because the word FREE was in big bold letters, and that’s what I focused on for the most part. Since I was not paying 30-60 dollars upgrading my account, it was back to the editing board I went. I worked very hard to condense my video, and finally was able to hit that FINISH button about 30 minutes later.
Storyboard Mode
Step 5: Importing the Digital Story onto My Blog
The final step is uploading the finished video to my Blog. Click here to view the video!
The Reflection
Taking the videos and images with my cell phone worked well. I did not have any issues with my phone, or the uploading of the material from the mobile device to my email address or Google Drive. My struggles came when I had to decide which platform to use to create my video, and the editing process when configuring my video. Next time, I will go beyond the website to understand a tool; even creating an account and exploring WeVideo before hand did not better prepare me for this assignment. Looking at tutorials, over examples, and reading personal experiences from others, is truly helpful above anything else. I would love for my students to create their own Digital Stories in our unit on Contemporary Postmodernism; in that unit, students can be more creative with their writing, and I believe we assign a project on creating a memoir in the same unit. WeVideo would be a great tools for my students to use. I would advise they create accounts to explore beforehand, but also, review tutorials on the tools as well. So students could see beforehand a finished product, I would make sure they have access to one of my examples, and I would even make time to walk them through certain steps as well during LiveLesson. We guidance, WeVideo can be a fantastic tool to create some unique works and bring stories to life. I will definitely use this tool again.


No comments:
Post a Comment